Showing posts with label halo reach. Show all posts

Saturday, 9 June 2012

Halo Reach Vehicles


Vehicle Pool

Vehicles fall into a unique category within Halo Reach. Each class of vehicle has a certain role to play at any given time. Generally the classes are Transport, Support, and Attacking vehicles. Beside each vehicle description below will be the class it fits into and why.

Vehicles tend to draw lots of attention. As such, using vehicles too much will result in them being overcome by a determined team. Plasma pistol charge shots and the emp effect from grenade launchers can stall all vehicles.

UNSC Vehicles

Mongoose


Role: Transport (only)
Driver: 1
Passenger: 1
Armaments: None
Durability/Strength: Weak
Weaknesses: Tend to roll easily. No protection for passengers.

This vehicle is for transportation only and has no offensive capability.


Warthog laag


Role: Support and Transport
Driver: 1
Passenger: 1
Gunner: 1
Armaments: None
Durability/Strength: Weak
Weaknesses: Tends to roll. Large target for Anti-Vehicle weaponry.

The Warthog laag is mainly a support vehicle.
As such the LAAG will overheat if fired too much, and require cooling.


Rocket Warthog


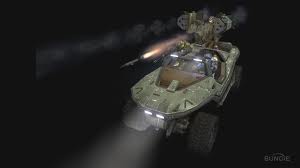
Role: Support, Transport and Attack
Driver: 1
Passenger: 1
Gunner: 1
Armaments: None
Durability/Strength: Moderate vs light arms
Weaknesses: Tends to roll. Large target for Anti-Vehicle weaponry.

You can only see this version of the warthog in Firefight missions and Custom gametypes, but not in standard matchmaking.


Falcon

The falcon is dubbed the 'warthog of the skies'. It is generally used as a support and attacking vehicle.


Role: Support and Attack
Driver: 1
Passenger: 2 (campaign only)
Gunner: 2 (one each side)
Armaments: 2x ChainGuns
Durability/Strength: Moderate/Strong vs vehicle and light arms
Weaknesses: Large target for anti-vehicle weaponry.


Scorpion Tank


The Scorpion is one of two tanks in the halo reach vehicle pool, and possesses the most potent direct fire canon as well. As it can deal out and take a lot of punishment it's primary role is that of attacking the enemy.


Role: Attack (and support)
Driver: 1 (operated the main canon)
Passenger: 0
Gunner: 1 (machine gun, can not be used by driver)
Armaments: 1x main canon 1x machine gun
Durability/Strength: Heavy/Strong vs vehicles, light arms and anti vehicle weapons.
Weaknesses: Large target for anti-vehicle weaponry and easily  Hi-Jacked infantry.


Covenant Vehicles


Ghost

The ghost is a quick response ground support unit. It sports a boost function which redirects steering and canon power to speed around the battle field quickly. The driver is somewhat protected from the front, but the back and the sides leave a driver exposed.


Role: Support (and attack)
Driver: 1 (driver operates canons)
Passenger: 0
Armaments: Dual plasma canons.
Durability/Strength: Light: average vs light arms, weak vs anti vehicle weapons.
Weaknesses: Less effective versus tanks and aircraft. Armour lock.


Revenant

A Revenant is more of a hybrid between a ghost and a wraith, having the agility and speed of a ghost with it's main weapon being a larger version of the concussion rifle round having the arcing trajectory of a wraith tank shot.


Role: Support (and Attack)
Driver: 1 (driver operates canon)
Passenger: 1 (can shoot hand weapons)
Armaments: Plasma Caster
Durability/Strength: Moderate: average vs light arms, weak vs anti vehicle weapons.
Weaknesses: Less effective versus tanks and aircraft. Armour lock.


Wraith


The Wraith is one of two tanks in the halo reach vehicle pool, and possesses a destructive plasma canon. As it can deal out and take a lot of punishment, the wraith's primary role is to attack the enemy.


Role: Attack (and support)
Driver: 1 (operated the main canon)
Passenger: 0
Gunner: 1 (plasma repeater canon, can not be used by driver)
Armaments: 1x main canon 1x repeater canon
Durability/Strength: Heavy/Strong vs vehicles, light arms and anti vehicle weapons.
Weaknesses: Large target for anti-vehicle weaponry and easily  Hi-Jacked infantry. Weak versus banshees.


Banshee

The Banshee is the quintessential covenant aerial flier. It can boost for a long time and can strafe all targets with ease. Also expect to see operators doing fancy aerial flips to avoid attacks, even the lock on of rockets.


Role: Attack (and support)
Pilot: 1 (operates all weapons)
Passenger: 0
Armaments: Dual plasma repeater canons, 1x fuel rod gun.
Durability/Strength: Average/Moderate vs light arms
Weaknesses: Weak strength compared to Falcon, can't shoot directly underneath itself. (blindspot)

Covenant Weapons


Covenant Weapons


Plasma Pistol


The plasma pistol fires single shots and as all plasma weapons, tends to be more damaging against shielding. However the party piece of this weapon is the overcharge feature which will annihilate all of a targets shield in one hit. Very handy if used in conjunction with a DMR or Pistol for example.


Plasma Rifle


This is the standard automatic rifle for the convenant, and does very well versus shields. Has a tendency to overheat with sustained fire.


Plasma Repeater


The plasma repeater is an advanced version of the plasma rifle with a far superior rate of fire. The shots do slightly less damage than the standard plasma rifle. Constantly firing the weapon causes it to fire more slowly, in which case the user needs to vent the heat out to resume full rate of fire.


Needler


A favoured side arm, whilst individual shard 'needles' are relatively weak, after several needles hit a target a super-combination of the shards results in a pink explosion, killing the victim and damaging nearby enemies.


Needle Rifle


Similar to the needler, the shards sport a similar super-combine effect. However more akin to the designated marksman rifle in that the needle rifle is intended for mid-range targets and as such supports head shot capability. Note that individual shots tend to be weaker compared to individual DMR shot when stripping enemy shielding. But up close, just hold down the trigger for semi-automatic action.


Focus Rifle


Somewhat akin to a sniper rifle but more so to the Halo 2 sentinel beam. This weapon can shoot a beam across the map. Continuous tracking of the target is needed for a kill. And there is no instant kill or headshot capability.


Concussion Rifle


The Concussion Rifle is more akin to the Halo 3 brute shot. A grenade launcher type that shoots explosive plasma. Firing 6 shots that can blast an opponent off course is quite handy.


Energy Sword


This one hit kill slicer is still as deadly as ever. Once the reticle turns red (when within range) you will lunge through the air and kill the opponent in one go. However if take care if they have a shotgun, as you will die mid lunge.


Gravity Hammer


The brute gravity hammer causes infantry, vehicles, rockets and grenades to fly off course. It also sports a small lunge feature. Generally killing in one smash.


Fuel Rod Gun


The fuel rod gun is an anti vehicle weapon that does extremely well against infantry too. 5 shots allow the user to fill the surrounding area in a deadly hail of large explosive plasma bolts. Caution is required when using this weapon. No lock on feature included.


Plasma Launcher


The plasma launcher is an anti vehicle weapon that can be used against infantry too. With 4 shots per salvo this weapon allows the user to fill the surrounding area in a deadly hail of  explosive plasma bolts. Each shot can lock on to a person or vehicle. Requires time to charge each shot.

Halo Reach UNSC Weapons


HUMAN WEAPONS

MA 37 Assault Rifle


The standard assault rifle, your basic starting weapon. Great for short range engagements. Best  kept as a secondary weapon or switched for something else. 32 Bullets per magazine.


M6 Pistol


The primary sidearm weapon of the UNSC, the Manum Pistol is great at short to mid range and can easily overwhelm a non-shielded opponent. With 12 bullets per magazine this sidearm can be switched to when a primary weapon runs out of ammunition, to finish the job as it were.


M392 Designated Marksman Rifle (DMR)


The DMR (designated marksman rifle) is the weapon of choice in any id range battle. With deadly accuracy, a good clip and powerful damage per bullet you want this as your primary weapon. Headshot capability makes it even more deadly. 15 Bulet per magazine eans you wil be dealing a lot of damage.


Sniper Rifle


The daddy of long range and open areas. Don't mess with this. It's a power weapon with one shot kill capability. But aiming ability is needed, as missing will leave you open to attack.


Shotgun


The monster of close quarter combat. Even against a sword  you will come out victorious.


Rocket Launcher


The Spankr. The favourite power weapon of choice. Quite literally any one at the business end of this becomes toast. Care is needed so as not to suicide with it. Can also lock on to vehicles for anti-armour support.


Grenade Launcher


A great addition to the arsenal, the 'Pro Pipe' has emp type grenades which decimate shields and stalls vehicles. But if you land the grenade on a human target they will die in one shot.


Spartan Laser


The Spartan Laser or 'Splaser' is an anti vehicle weapon which blows up pretty much most vehicles in one shot or two (like tanks). But it can be used against infantry too. Charge up the shot and whatever you hit will get roasted. Simple huh.


Grenades


There are two types of grenades in Halo Reach. The fragmentation grenade (left) and the plasma grenade (right). The most notable difference is that the plasma grenade sticks to players and vehicles, and fragmentation grenades do not. Also all grenades can be shot when on the floor or in mid air once thrown by a player.

Thursday, 22 March 2012

Update: Site Transformation to Halo 4

Ok so this place has been going well, and I am very happy to see it grow accordingly. Now that we've had our first taster of Halo 4 everyone is eagerly awaiting its release. Because Halo 4 will be very popular within the upcoming months as we get drip fed pieces of information about it, I feel the need to update the current state of Halo Master Class. The idea is to keep everything pretty much the same in terms of format and layout, but to shift all the Halo Reach stuff into a  box and store it away in a nice little section on it's own and tucked away all safe and sound. This reallocation of posts and pages will allow room for all the glorious info that will come to light from 343 industries and the Halo 4 title in the months ahead.

The already mentioned changes will take place gradually as new aspects of Halo 4 are introduced to the general public. Hopefully when a few of the key details are finalised about what we want to change around here, expect a monthly update to introduce you to a breakdown of the areas that will change so you will know what has been adapted.

In keeping with the wealth of information relating to Halo Reach, the section of Halo 4 will include weapons and vehicles, with images and videos of them too. And of course regular posts about key aspects of the game, multiplayer, campaign or any other useful information that is worth your time to note down.

So look forward to a flurry of activity coming your way soon, fellow Halo fans.

Wednesday, 25 January 2012

How to Use It Effectively - The Warthog

The first video shows you how a well co-ordinated team can score a flag capture very effectively.

The second video, although taken way back in the beta, shows how the warthog operates effectively against infantry, but can get destroyed quickly by a wraith tank.

The Warthog can be a potent weapon in the hands of a skilled solo player (or duo of players). On the other hand it can be a death trap for lonely and untrained drivers. We will briefly look at why this is the case and how you can learn to distinguish the right situation to use the warthog.

First things first, the warthog is a bulky jeep that swings around and draws lots of attention when sighted and by it's distinctive sound.

To use this vehicle effectively both the driver and gunner need to possess strong awareness skills, particularly so with the driver. The driver needs to be aware of armour lock users, the person carrying the rockets or other anti-vehicle weapons, if any tanks or banshees are on the battlefield, where his gunner needs to focus fire, objective carriers etc etc...

But the driver also needs to make life easy for his gunner. Only the gunner can attack, but he is much more exposed. Because of this the gunner and will be targeted first. A driver needs to help point the gunner toward his target(s), and to circle around them maintaining a good distance so as not to be under immediate threat.

At times the vehicle and/or players need to heal up, so retreating or fleeing can be the safer option. Along with evasive driving to avoid armour lockers, grenades and sharpshooters.

In battles which involve the warthog as the main fighting force versus infantry (foot soldier), the driver should focus on keeping at a sensible distance and always staying on the move. If you stay still for too long, grenades will hit, flip or destroy the warthog quickly.

In battles involving tanks, the best idea is to keep away from enemy tanks, and support your own tank guarding it from infantry attackers.

If negotiating with a banshee, drive directly underneath the craft to avoid it's shots. This enables the warthog gunner to attack the aircraft without recourse.

Avoid using the warthog on your own, and always try to team up with a player who communicates so you can coordinate your efforts when in combat.

Avoid using the warthog if the opposing team are capable of destroying any/all of your vehicles quickly, this may be because they have an excellent banshee or tank player, or someone who hordes the anti-vehicle weapons constantly throughout the match.

As a warthog gunner, try and focus shooting at short and mid range targets. And always take every opportunity to let the chain gun cool, rather than overheat. Because without being able to fire you could panic and die. Remember to prioritise your targets, if you run head-on into a battle and encounter another warthog, take them out first, mopping up the infantry later. If you have a tank shooting at you retreat and target other infantry instead.

Remember the warthog's primary role is to support a team, not be the focal point in a battle. Just because you are fairly quick does not mean you are indestructible. You are not a tank.

As with any vehicle, practice playing around with it on your own. Try to get a feel for how it handles, then try using it with a cooperative teammate. That's when there will be lots of fun to have using it!

How to Use It Effectively - The Mongoose

The first video demonstrate the ability to splatter opponents who don't watch their radars (of course good players would have killed the driver). At around 1.03 the mongoose driver does some evasive wobbling to avoid getting head-shotted by DMR fire, and he takes cover behind the base itself.


In this second video the mongoose driver assists the flag carrier to quickly return the flag. This is one great feature of the mongoose because it is a smaller target than all other vehicles and is the quickest too.

Effective Use

It's quite a short story when it comes to using the mongoose effectively. Most times you will utilise the mongoose to quickly collect power weapons or to transport an objective like the flag. Because of having no firepower and being exposed from every angle, if you get fired upon your best option is to flee behind cover, out of range or to bail out and start shooting back.

In rare cases you may be approaching an opponent and may be able to attempt a splatter. But this could prove dangerous as the mongoose tends flip over instead of killing your opponent. Think of the mongoose as a quick transportation tool only, and you can't go far wrong with it. The mongoose is a means to an end, the end being a quickly obtained power weapon, an advantageous position or a flag capture.

Tuesday, 17 January 2012

Covenant Vehicle Basics

So here is the covenant section of vehicles. Although they are similar in types like support and attack, they use of each vehicle is unique from each, so you will need to practice a bit to get used to how each one works. To use vehicles effectively against smarter human opponents, look out for our upcoming series of video article that will show you the best way to use these vehicles to devastating effect.


Covenant Vehicles


Ghost

The ghost is a quick response ground support unit. It sports a boost function which redirects steering and canon power to speed around the battle field quickly. The driver is somewhat protected from the front, but the back and the sides leave a driver exposed.


Role: Support (and attack)
Driver: 1 (driver operates canons)
Passenger: 0
Armaments: Dual plasma canons.
Durability/Strength: Light: average vs light arms, weak vs anti vehicle weapons.
Weaknesses: Less effective versus tanks and aircraft. Armour lock.


Many operators use the superior agility and speed of the ghost to circle and strafe targets on foot. Even the boost function can be used aggressively to charge through and splatter victims who stray into open ground.
This tactic is now countered by armour lock, so be cautious. Ghosts are very quick when boosting, and can cover the length of a map in little time, much like a mongoose.


Revenant

A Revenant is more of a hybrid between a ghost and a wraith, having the agility and speed of a ghost with it's main weapon being a larger version of the concussion rifle round having the arcing trajectory of a wraith tank shot.


Role: Support (and Attack)
Driver: 1 (driver operates canon)
Passenger: 1 (can shoot hand weapons)
Armaments: Plasma Caster
Durability/Strength: Moderate: average vs light arms, weak vs anti vehicle weapons.
Weaknesses: Less effective versus tanks and aircraft. Armour lock.

The Revenant is used similarly to the way a ghost is used. You can circle and strafe ground infantry. However the main canon will not go toe to toe with heavy tanks and airborne opponents simply because the main weapon is easily dodged.
The Revenant can be used as an objective transporter carrying a passenger in the side seat.


Wraith (Tank)


The Wraith is one of two tanks in the halo reach vehicle pool, and possesses a destructive plasma canon. As it can deal out and take a lot of punishment it's primary role is that of attacking the enemy.


Role: Attack (and support)
Driver: 1 (operated the main canon)
Passenger: 0
Gunner: 1 (plasma repeater canon, can not be used by driver)
Armaments: 1x main canon 1x repeater canon
Durability/Strength: Heavy/Strong vs vehicles, light arms and anti vehicle weapons.
Weaknesses: Large target for anti-vehicle weaponry and easily  Hi-Jacked infantry. Weak versus banshees.


The Wraith Tank is the the Covenant heavy attacker on the battlefield. Its main purpose is to attack and hurt the enemy very quickly. Although the tank is slow and clumsy, not being anywhere near as agile as a ghost or revenant, it's arcing trajectory plasma bombs can be launched mortar style over obstacles and still batter opponents with deadly barrage of plasma. As with the Scorpion tank, a priority is keeping enemy infantry at distance. Another teammate can operate the plasma repeater canon for extra close quarter protection. The wraith does have a limited boost function to allow quick escape from attacks.


Banshee

The Banshee is the quintessential covenant aerial flier. It can boost for a long time and can strafe all targets with ease. Also expect to see operators doing fancy aerial flips to avoid attacks, even the dodging the lock-on of a homing rocket.


Role: Attack (and support)
Pilot: 1 (operates all weapons)
Passenger: 0
Armaments: Dual plasma repeater canons, 1x fuel rod gun.
Durability/Strength: Average/Moderate vs light arms
Weaknesses: Weak strength compared to Falcon, can't shoot directly underneath itself. (blindspot)

Banshees are very deadly in the right hands. They can quickly pick off individuals or groups of enemy infantry. Even ground based tanks can be threatened by a skilled Banshee pilot.

Thursday, 12 January 2012

January Update

Hello everybody.

As we are plunging into a new month and new year (as you may have heard),  I've got some updates for you to be aware of that have recently taken place.

  1. The video series of How to Use Armour Abilities Effectively has now finished. Each one included a video or two of some serious in-game action that focused on each of the particular armour abilities. If you missed them they can be found on the Homepage or on the Basics and Advanced page under the armour abilities sub-heading.
  2. The Basics and Advanced page has been updated to include all the above mentioned armour ability links to their corresponding articles.
  3. The Merchandise and Games pages are available to view via the menu bar, but the pages themselves are still in a state of flux. Changes will be taking place soon.

With those updates in mind what is on the horizon?

Well the primary focus for upcoming weeks will include adding vehicles to the Weapons and Vehicles page. And with the addition of including the vehicles I may include some useful articles on how to use the them effectively as well. So watch out for some cool new images, photos and descriptions of all the Halo Reach vehicles that the game has to offer.

And looking ahead to Halo 4, only some details have come through about it so far, referring of course to the teaser trailer and official concept artwork of last year. But be assured that when something interesting pops up I'll do my best to shove it into your faces asap so you don't miss a thing.

Well that's all for now.


How to Use Drop Shield Effectively


Drop shield is intended as a defensive and healing ability. When used effectively a player can time it very well to protect an objective or to save himself or his team from immediate danger. Like the video above shows: the user throws down a quick drop shield just before the red attacker fires a rocket. The rocket splash kills the red player whilst the blue player remains alive.
Of course if you find yourself low on health and not under attack, it is a good idea to throw a drop shield down to obtain full health once more.
Remember that drop shield only heals the health, not the shielding, of any player(s) within its bubble.

Monday, 19 December 2011

How to Use Hologram Effectively


The first time the player uses hologram he sends it across the bridge. The second time after a lapse in fighting he aims the hologram to the floor next to where he is standing. The players then runs across the bridge in a straight line pretending to be the hologram. After the enemy dismisses him as a hologram he opens up fire and kills the other team.

Genius.


This next video uses the hologram to confuse the enemy and claim a nice double kill. Good work.

Thursday, 15 December 2011

How To Use Armour Lock Effectively


In this short 30 second clip you will see just how to use armour lock effectively. The player uses armour lock to destroy a ghost who charges directly at him. The ghost explodes and he gets the kill. Then a warthog tries to run him how, the warthog gets flipped and stunned.

Can you see how simple but effective armour lock can be when used correctly for defending, but then how that defence can be turned around into an offensive power/ability. One that can tip the battle in your favour.

Try doing this yourself, just to see how easy it is to kill a charging vehicle.

Armour Abilities: How They Work - Part 3

As everybody knows by now, when Halo Reach hit the shelves back in Sept 2010, and having sampled the beta myself in May 2010, the newly included armour abilities were introduced into the game.

The idea behind armour abilities is to give a player a certain advantage in battle. And to fit in with the story of Halo Reach, the planet Reach was primarily a military fortress world where new technology was being developed. Hence we get these armour abilities. From the next game in the series point of view the armour abilities are a more refined version of the deployable, and 1-time use, equipment from Halo 3.

Now, there are several armour abilities you get to choose from when you begin a match in Halo Reach. These armour abilities are preset by the gametype and match you are playing.

The armour abilities include:

  • Sprint
  • Evade (elites)
  • Armour Lock
  • Jet Pack
  • Medic (drop shield)
  • Camouflage
  • Hologram


    We'll take each armour ability at a time, describing how it works dynamically, and then a brief note on how to use it to full effect.

    Note: all armour abilities have a cool down time once used, which replenishes automatically, some take longer than others. And you get the choice to switch which ability you want to use each time you respawn. So you can keep changing them each time if you want.

    Copy and paste over. In part three of this article we will look at the last two of the Armour Abilities. We'll talk about Camouflage and Hologram.


    CAMOUFLAGE


    Camouflage is an armour ability that renders your character somewhat invisible to the eye. When activated two things happen, you become invisible and the radar gets jammed. The reason for this is for balance so even though you may not be seen, an enemy will know you are nearby.

    Things to know about Camouflage. When pressed the ability meter will begin to drain. The rate of drain depends on how fast or slow your character is moving. Camo is more effective when moving slowly and drains the meter much slower. You can fire when camouflaged but the more you do the more visible you will become.

    Using camouflage can work well with melee weapons like the sword or hammer, or even the rocket launcher or sniper rifle. You can sneak into position, or stay in a really open place where no one usually travels and still be safe. Camo can be used to distract a whole team when attacking or defending. One player pops their camouflage and the other team will lose their radar to the jamming effect, thus disrupting their flow and co-ordination.


    HOLOGRAM


    Hologram projects an image of your character when activated. The hologram moves across the terrain to wherever you have pointed your reticle. Holograms serve to confuse your enemy into wasting shots, or distracting them while running away or towards them.


    Things to know about hologram. Only one hologram can be activated at a time. The ability recharges quite quickly. If a hologram has not disappeared before a new one is deployed, then the old one will vanish when the new one is activated.

    Hologram is mostly used in team sniper games. Hologram is the bane of snipers because not only does a shot become wasted, but your position is revealed as well. A trick that many use when closing in on someone is to send a hologram right at them, this can confuse their aim if done correctly, as both the hologram and the players tend to merge in and out of each other.

    So that's all for now on armour abilities. I hope you have a good idea of how they work now and how you can use them to good effect in your online matchups.

    Wednesday, 14 December 2011

    Armour Abilities: How They Work - Part 2

    As everybody knows by now, when Halo Reach hit the shelves back in Sept 2010, and having sampled the beta myself in May 2010, the newly included armour abilities were introduced into the game.

    The idea behind armour abilities is to give a player a certain advantage in battle. And to fit in with the story of Halo Reach, the planet Reach was primarily a military fortress world where new technology was being developed. Hence we get these armour abilities. From the next game in the series point of view the armour abilities are a more refined version of the deployable, and 1-time use, equipment from Halo 3.

    Now, there are several armour abilities you get to choose from when you begin a match in Halo Reach. These armour abilities are preset by the gametype and match you are playing.

    The armour abilities include:

    • Sprint
    • Evade (elites)
    • Armour Lock
    • Jet Pack
    • Medic (drop shield)
    • Camouflage
    • Hologram

      We'll take each armour ability at a time, describing how it works dynamically, and then a brief note on how to use it to full effect.

      Note: all armour abilities have a cool down time once used, which replenishes automatically, some take longer than others. And you get the choice to switch which ability you want to use each time you respawn. So you can keep changing them each time if you want.

      Copy and paste over. In part two of this article we will look at another two of the Armour Abilities. We'll talk abut Jet Pack and Drop Shield.

      JET PACK


      As you would expect jet pack allows you the ability to fly around for short periods of time. When activated the JetPack will send you upwards a certain height as long as the button is pressed. To cover a gap or distance over the ground you can pulse the trigger for short burst to cover a long distance.


      Things to know about JetPack. You can fire your weapon whilst flying. If you fall from the air you will still take fall damage. When falling if you activate a short burst of your JetPack you will soften the fall and can avoid sustaining heavy amounts of fall damage. JetPack recharges fairly quickly when not in use. JetPack can be used to hop up several levels in a short space of time than if you were manually running on foot.

      JetPack works very effectively if you have a rocket launcher. The added height advantage affords you air to ground shots, with a much reduced chance of blow back on your character. Caution is required for JetPack-ers as flying around all the time with no cover makes you an easy target. Also a neat trick is to jump before activating your JetPack for a better climb in the air.


      DROP SHIELD


      When deployed the drop shield creates a bubble, sphere, of protection from damage. It also heals the health, not shields, of any player inside it. This bubble can only sustain so much damage before expiring.

      Things to know about Drop Shield. When activated your ability meter will drain entirely, giving you only 1 bubble shield per shot. However if you press the button accidentally and the character does not compete the animation, you will not drop a shield and the meter will remain full.

      Drop shield is great for blocking in door ways, and then protect them with melee weapons. Or just for a quick heal. Also the protection offered in objective based games proves a very powerful armour ability to have.


      In part three the last two armour abilities will be discussed.


      Tuesday, 13 December 2011

      Armour Abilities: How They Work - Part 1

      As everybody knows by now, when Halo Reach hit the shelves back in Sept 2010, and having sampled the beta myself in May 2010, the newly included armour abilities were introduced into the game.

      The idea behind armour abilities is to give a player a certain advantage in battle. And to fit in with the story of Halo Reach, the planet Reach was primarily a military fortress world where new technology was being developed. Hence we get these armour abilities. From the next game in the series point of view the armour abilities are a more refined version of the deployable, and 1-time use, equipment from Halo 3.

      Now, there are several armour abilities you get to choose from when you begin a match in Halo Reach. These armour abilities are preset by the gametype and match you are playing.

      The armour abilities include:

      • Sprint
      • Evade (elites)
      • Armour Lock
      • Jet Pack
      • Medic (drop shield)
      • Camouflage
      • Hologram

        We'll take each armour ability at a time, describing how it works dynamically, and then a brief note on how to use it to full effect.

        Note: all armour abilities have a cool down time once used, which replenishes automatically, some take longer than others. And you get the choice to switch which ability you want to use each time you respawn. So you can keep changing them each time if you want.


        SPRINT

        Sprint is well sprinting. This is much faster than the ordinary run speed. You can not fire when you sprint, but can fire very quickly after you stop.

        Things to note about sprint. If you jump when sprinting you will leap much further than normal. This is handy for jumping big gaps, evading an enemy or fleeing a vehicle. A deadly combination of sprinting is using a melee weapon like the sword or gravity hammer. You sprint up to an opponent and kill them in on hit with the sword or hammer.


        Tip: Press the sprint button again to stop the sprinting before the meter runs out. The recharge time is fractionally less than if you were to let the meter run down entirely.


        EVADE

        Evade is commonly used by elites. It is an ability that allows the player to perform a rolling manoeuvre in whichever direction the character is running. A player can evade 2 times in quick succession before the meter runs out. After which the ability recharges.

        Things to note about evade. Whilst evading you can not fire. A good way to use evade is to use one evade to move around and attack, and then use another evade to take cover again. Also, try rolling behind an enemy so they can't shoot you. You can also use two evades to close in on an opponent quickly if they are far away, then melee them with the sword. 


        Tip: If you jump immediately after evading, the jump will be slightly more pronounced in distance leapt than a regular jump. However this was toned down slightly from the beta.


        ARMOUR LOCK

        Armour lock is a protective ability which makes you immune to damage. Yes you become invincible. The ability remains on only as longs as you hold down the trigger. Your character goes into a crouch position, unable to move. However you can still revolve the camera around to see any enemies. And once you release the trigger the ability releases a small emp shock that reduces nearby enemy shields. 

        The intended use for armour lock is versus a vehicle. Say a ghost or warthog that wants to splatter (crush) you. Armour lock can destroy a vehicle that hits you directly when activated. 

        Things to know about armour lock. Armour lock can be activated twice in succession, or continually for several seconds. 


        Tip: If you are nearby an enemy armour lock and release, then beat them down with a melee. The emp effect reduces their shields and you get a free kill. If an enemy armour locks, run up to him and use your armour lock. Simply wait and release after he comes out. Other tactics include locking, thus avoiding damage, releasing and throwing a grenade, then armour locking again to stay alive.


        The other four armour abilities will be discussed in part 2.

        Saturday, 10 December 2011

        Part 3 - Advanced Online Multiplayer Tactics: Giving You The Advantage

        Halo Psychology- 101 

        All players will do these things when the game begins:
        • Run for a DMR. (a good habit, I'm not slating this one)
        • Rush for the Power Weapons (Rocket, Sword, Shotgun, Sniper rifle) (again a good habit, but if done incorrectly, ie: without support, can lose you control of the weapon and start the game off badly)
        • Rush for the nearest Vehicle (usually a Banshee or Tank, or worse a mongoose or warthog [alone in a warthog lol!]) 
        • Run headlong into the middle and engage the first opponent(s). 
        This comes from several years of online experience observing, not just the enemy but also your own team mates, and my own movements. These things aren't bad in themselves. You always need to get better weapons. But rushing in all the time will only work for so long. Once you face a team of well drilled opponents you will be dead before you can call for help or retreat.

        The first two points in the above list are good things to do. Especially if you use your map knowledge. When it comes to playing as a team, it is better that all of you have a DMR as your primary weapon. As a team of DMR users will most likely always win vs a team using pistols and assault rifles. 

        Some players may squabble if there are not enough DMR nearby. Avoid getting upset or team killing if you don't grab a DMR. It's not the end of the world, just use your map knowledge and head for a different one. 

        When it comes to attaining a power weapon , like the rockets, you will stand a good chance of claiming it, or taking it off a player who has rushed to get it, if you have a DMR than if you purely rush in with your assault rifle. This is a judgement call you have to make each game at the outset. If you get it wrong and die, and gift the power weapon the the other team, you are in a bad position and generally will lose a few (team) kills because of that.

        Rushing for a vehicle depends on the game type and map. If it's an objective game then it is helpful to have a warthog circling around and picking up and dropping off players. However if you rush in a vehicle alone and then try and take on the other team alone you will invariably lose each time.

        The last point about darting into the 'middle' or straight towards the opposing team is something that should be avoided. To do this try and plan your movements so that you can circle around or perhaps pick off individual/alone players. Use of your map knowledge and radar is key when moving around the map towards the opposing team.


        All players will do these things when they spot you:
        • Fire- Even if they have an assault rife vs your DMR and are miles away. 
        • Charge you down. Opponents will always run towards you no matter what. (generally bad but particularly hilarious if they don't spot you have a sword or shotgun, happens so many times)
        • Panic when their shields are down and try to hide behind something and stop attacking. (of course by this time its too late to think about that)
        • Hurl grenades if they see you have a superior weapon to them, forcing you to evade. (I love grenades and they can be used correctly)
        Recognising a Good/Bad player:

        These general rules apply to team mates and to the opposing players as well. After playing for a minute or two into a match you should have an idea of how good everyone is playing. You can tell how good or bad a player is by:
        • Their movement around the map, do they know where the weapons are? and do they use them effectively? do they support you and stay together, or not?
        • Does this person have murderous accuracy or aim to get headshots?
        • Do they pay attention to the radar, or do you have to tell them an enemy is coming from behind?
        • Do they just pick up any weapon because it is there? needler (less favoured in online matchups) Or do they just bomb around with only their assault rifle?
        • Do they communicate what they want to do and where the enemy are coming from, or not
        • Have they got lots of kills like 4 or 5 in the first minute? or after a couple of minutes do they still have 0?
        As you can see it is not hard to tell who the good and bad players are even in the opening minutes of a match.

        Weapon Feinting:

        This is the practice of firing/ using a weak weapon like the assault rifle to draw a target towards you, making him think he has the upper hand. Then (usually after rounding a corner) switching weapons to a sword or rocket launcher.

        Many people still don't look at their opponent to see what secondary weapon they have. That big tube thing that sticks up in the air is the rocket launcher.

        If your feint fails you can get into trouble. If you fire your shotgun prematurely, a sensible player will back off, throw grenades and always keep enough distance away from you so you can't one shot him. 

        If used correctly you can bluff being weak, then pop out the big guns and take the opponent off guard. Also try feinting with crouching around a corner for an even deadlier mix.

        Friday, 9 December 2011

        Part 2 - Advanced Online Multiplayer Tactics: Giving You The Advantage

        Scoring, A Simple Numbers Game, That Many Don't Get

        I remember reading about this in a Halo 2 strategy guide way back in 2004/5 and it was one of two strategy guides I bought for the game. The guide focused primarily on online multiplayer, detailing all the release maps and vehicles and weapon locations etc... but the logic and strategy and psychology that the guide taught me is equally as valid now.

        One thing it taught me was how to monitor your team score and how your kills and deaths affected that score. It also showed how you can make a difference by paying more attention your team mates as well as the score board to improve and win more of your games.

        Let's take a look at what I'm talking about.

        In a standard 4v4 team slayer you have 50 kills to score. You have got to achieve those 50 kills before your team gives away 50 kills (deaths). Check. So this means each time you die you give away 1 point. Obviously.

        So then you should be in the mind set of scoring 1 kill each time you die or better. Obviously you win if you do better and score a kill without dying or if you score at a ratio of 2 kills (or more) to one death. This means that on each spawn cycle you are scoring more than your opponents are. Which is better than both getting to 49-49 and it being a lucky last kill victory.

        So how do you achieve this?

        A large part involves
        • staying together as a team
        • controlling the power weapons 
        • avoiding giving away your position, but ultimately 
        • paying attention to how the game and score progresses.

        Yes, you have to pay attention to the score throughout the game. You and your team need to get a feel for how the game is going, and make adjustments to the way you play.

        If your scores are tied, then both teams are scoring evenly. Going back to the ratio analogy from earlier, you are getting 1 kill to 1 death. Which means you need to tighten things up. You need to pay attention to the weapons, enemy movement, their tactics and your teams overall effectiveness to the the advantage. 

        How? COMMUNICATION!  (the second biggest point/problem in online gaming in that 2004 strategy guide I mentioned earlier on)


        use your microphone and remind your allies to stop running at the enemy. Tell your team mates where the enemy are, what weapons they have etc... but speak calmly to your team and use their names to make things clear. People respond to calmness and respect better than hate, an upset tone or sarcasm.

        Personally you will get a feel for how much you or a certain team mate is dying. Or you may notice that in the first few minutes a team mate already has 10-15 kills. It comes with practice. Commend good players, help weaker players.

        When you do this you begin to score without giving away as many kills to the oppsition. You start drifting toward the 2 kills to 1 death ratio. And your team confidence will take a boost. You all realise that you can win if you work together better.

        The next part in the series will look at player psychology and weapon feinting.


        Wednesday, 7 December 2011

        Part 1 - Advanced Online Multiplayer Tactics: Giving You The Advantage

        Here is a quick list of the topics we will go through together to help you improve your halo gameplay to match and beat other people in Halo's online multiplayer.

        These tactics should become an integral part to your playing style to make the best improvements in your gameplay. In part one of this series we will look at Crouching, and Hiding from view and Weapon respawn times.

        The rest of the points this series will look into are:
        • Crouching/ hiding
        • Vehicle and weapon respawn timings.
        • Denying Power Weapon control.
        • Score Tracking and How You Affect Scoring.
        • Player psychology, the enemy and you. When to engage, how to pick targets, what to do, spotting a good player vs a bad one.
        • Weapon Feinting.

        PART 1  -   Crouching and Hiding


        A small part of Halo that so many still do not utilize, is crouching. Why is this? Psychologically many just want to rush into battle and don't even consider crouching to be a relevant part of the game.

        Crouching makes you invisible to radar! Everybody who looks at their radar is blind to your exact location when you crouch. Adversely if you crouch too much you won't get into any battles, and will lose your team the game because you are reducing the overall team effectiveness.

        There are appropriate times to consider crouching. The first is to set up an ambush. This is best done in common walkways or specific rooms that get a lot of traffic. Ambushes focus on the use of a combination of crouching and perhaps using an armour ability and/or a power weapon. The use of a shotgun, sword, rocket, or an assassination move are the best options when constructing an ambush.

        When is the best time to start crouching in general? There are at least four occasions: 
        • when you are out of an opponents visual or radar range, allowing you to 'creep' into position. 
        • when a frantic battle takes place and there is a lot of radar activity.
        • when being pursued by an opponent, crouch after rounding a corner, and switching to a sword or shotgun.
        • When shooting with a DMR, crouching slightly improves long range accuracy, by reducing the bloom.
          The objective of crouching is to confuse an opponent, or to remain hidden from them entirely. Because when people don't see you, you have the advantage!

          Vehicle And Weapon Respawn Timing

          I'm not sure of the exact figures for each specific weapon and vehicle respawns on all of the maps, you'll have to search for that yourselves. However the exact timing can be deduce by learning it in game and by regularly checking for a specific power weapon, during the course of a match. Power weapons like the Rockets spawn around every 3 minutes, so that there are 4 respawns during a 12 minute match.

          This is another important aspect of the game to master, as basic control over the weapons begins with knowing when they appear and basing your movements around that. It's not so much about being able to know the exact time as it is about getting the feel for when a weapon appears, and checking once or twice if you're not sure.

          And it's the same with vehicles, they all have their set amount of time before they respawn. Don't be hovering around a vehicle spawn for minutes on end, as this only sacrifices your team's overall effectiveness/synergy. A good example is the falcon on spire, lots of people want to get it and trek all the way there, then lingering around for minutes on end. This is a waste of time and team effectiveness.

          Of course knowing exactly where all the weapons are is a basic map knowledge that you build up over time. There are many MLG articles about the exact timings and weapon maps (see below) to save you going through each map yourself to learn where a certain weapon comes from.


          Most weapon maps look like this. But its a good idea to try going into the map and having a quick run around just to get the feel of where some of the key weapons are, and how long it takes to spawn after using them etc...

          Part 2 - we will be looking at two more aspects that are considered advanced for Halo Reach, these are: denying power weapon control, and how you affect the scoring of a match.